Preparing for a Photoshoot
- sarahhawley

- May 1, 2022
- 6 min read

When you see a great photograph, you might take a few seconds to take it all in and to really look at the image. You may even think about the photograph in more depth to consider why you appreciate the image or reflect on why you found the image to be successful. What was it that caught your eye and caused you to pause, viewing the image longer than you normally would?
Chances are that the image was not a quick snapshot that someone randomly took. If the image was made by a photographer (hobbyist or professional) what you don’t realize is that a lot of time and effort went into creating that successful image, it is also the reason why it is so well done. Planning the details of the photoshoot no matter how big or small is the key to successful imagery. The details can make or break an image.
Often a photographer starts with an idea and develops a plan to execute it. What do you need to create the shot? To begin, a professional photographer will put together a few documents to help get a clearer idea of what they want to achieve and what will be needed to achieve it. These documents also make it easier to show other people what you are trying to do (such as clients, stylists, assistants, etc.) These documents can include a Mood Board, Lighting Diagram, Creative Brief and/or a Style Guide.
A mood board is a collection of images that already exist and were made by other artists, photographers or even your own images from your portfolio that you have already taken. These images can come from a range of sources whether online or in print. It could be a board you make on Pinterest or one that you would actually cut and paste out of magazines and combine the images onto one sheet of paper. The mood board can help you find inspiration, provide a better sense of the style the image will have, and it is a useful visual aid to get your idea across to other people. Personally, I find images on the internet, and I put them into a one-page Word document and print it out, so I can refer to it as often as I need to. When looking for images to include in the mood board, think about the end goal of your final image. Is it a black and white, sepia or colour image? What colours will be in the photo? Is there a strong bold contrast or a softer colour palette used? What type of image are you going to make, a product shot, portrait, etc.? What lighting will be used? Do you need specific props? Will it be a close up shot or wide angle shot? The mood board along with the other documents really helps to narrow down what you want and what you don’t want in your final image.
A creative brief or style guide helps to further narrow down your idea and what you will need for the photoshoot. It’s a written document that lists specific info about the photoshoot itself. This includes the client’s info (if you have one), the time, date, and location of the photoshoot. It also lists the model’s info if you have a model for the shoot, as well as the concept or theme of the image, the use and orientation of the final shot, the colour scheme, background or surface, props, accessories and wardrobe that will be needed. Other considerations listed in the document may include the lighting style and/or lighting modifiers to be used, the shooting angle, the length of time needed to execute the image and any other notes or considerations that are of relevance to the photoshoot.
Usually the mood board, creative brief and the lighting diagram are attached together so all the info for the shoot is easy to access and in one place. The lighting diagram is a diagram that illustrates where the lighting in the photoshoot will be in relation to the rest of the set including the backdrop, camera, props, models, and/or product. It also shows what lighting modifiers will be used such as an on-camera flash or a strobe with a certain attachment that will manipulate the light like a soft box, snoot or beauty dish. The diagram is an image of what the set will look like, and it is used to speed up the process of building the set on the day of the photoshoot because you will already know where you want everything to go. It may change after you set it all up, but at least you have a starting point.
Some photographers will also put together a shot list. This is a list of all the different shots the photographer wants to take on the day of the photoshoot. It can be useful to create a list, helping you to remember what shots you need to get, or it can give you a range of shots, so you have variety to select from after the shoot is finished. There are a number of reasons why a photographer will put together a shot list and again, it’s a tool that helps you to better prepare for the day of the shoot and to ensure that the people you are working with are all on the same page. Also, after you shoot all the images on the shot list, you can then experiment with other shots in the time remaining during the shoot. The shot list ensures that you have all the images that you needed. These documents do take some time to prepare but the reward from doing all this prep is that you minimize the amount of time wasted on the day of the photoshoot and the shoot is more likely to run smoothly.
After creating these documents, a photographer will continue to prepare for the photoshoot by gathering items and making other arrangements. What you will need, will largely depend on the type of photoshoot you will be doing. Shoots with models may need costume, clothing or other wardrobe such as accessories, and you will need to book the model too. You may also need to book a hair stylist and/or a makeup artist. Product shoots usually need the product that will be featured in the image. If it is food that you are shooting, you may need to book a food stylist. In many other cases, you may also need to book an assistant, find props like plants or flowers, pick a location, or rent a studio space. You may also need to rent photography gear that you need but do not own. These are just a few of the most common things that photographers will make arrangements for in preparation of a photoshoot. Gather supplies and make your bookings well in advance of the shoot if you can, that way if any issues arise there is still plenty of time to find a solution.
The night before the shoot, confirm your bookings and go through your photography bag to ensure that all the gear you need is packed. Make sure all batteries are charged, you have lots of empty memory cards and maybe even a storage device to back up files on set. Have all the lenses you need and lighting as well as a tripod depending on the type of shoot. Check that everything is in working order and even prepare your camera by dialing in the settings to be as ready as you possibly can. What settings are best for what you are shooting? All this preparation will help to keep you organized and come across as very professional.
This blog mostly focuses on the preparation leading up to the photoshoot but not the shoot itself. Having said that, I encourage you to take lots of photos during your time on set (it is a pain if you have to reshoot and sometimes that is not an option), check that your images are in focus and have fun. Make the photoshoot a comfortable, and enjoyable environment for everyone involved, if you can, put on some appropriate music to create a desired mood on set. Finally, don’t forget to take breaks as needed.
After the photoshoot, the editing or post processing of an image occurs and that can really impact the final result. This step can include a few simple corrections or alterations but more often than not, this step is much more involved and can also take quite a bit of time to complete.
My point in illustrating all that is involved in producing a successful image from preparing for the photoshoot through to the editing process, is that there are a countless number of hours that the photographer or a team of people invest in making one great image. This image might make people stop to look at it for a moment longer than they normally would. These captivating images have so much that has gone into the behind-the-scenes work, that they deserve much more attention from many more viewers. I hope you think about that the next time you see an image that moves you or causes you to pause and maybe you will look at it for a bit longer in appreciation of all that went into that single photograph. I would also encourage you to share that image with others because it deserves the exposure.
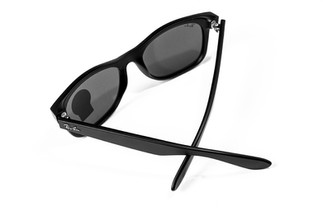
Below is a gallery of images from my latest photoshoot using Ray Ban Wayfarer Sunglasses.
Please note that I am not associated with Ray Ban Sunglasses nor was I hired to shoot this body of product photography. I just love photography and thought I would practice by photographing my new pair of Ray Ban Wayfarer Sunglasses.


Comments